When the question is “why,” “because” is seldom the answer sought. Of course, it was “because” that came to my ears with a frustrating frequency in response to so many questions asked in childhood and, as it was then, it seems to be again as a historically informed cabinetmaker. We can often learn a lot about how a piece of furniture was designed and built through careful study of measurements, tool marks, and so on. Every so often these “hows” point to why a particular shop made a particular piece this way or that way at some particular moment in time. Far more often however, our sense of how something was executed leads – at best – to only a vague understanding of why.
The question that has been weighing on my mind of late is this: Why did Peter Scott build the bookcase for this late 1720s desk the way that he did? More specifically, why did he join the bottom to the sides with elephantine dovetails?
Here’s my version of the walnut desk and bookcase in its current state of incompletion.
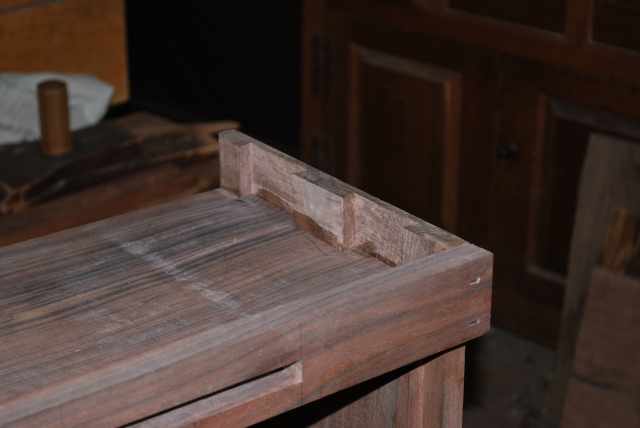
Here are a couple of views of the meaty dovetails on the bottom of the bookcase, which needs to be raised up from the bottom of the sides to make room for candle slides.
I was hopeful that cutting the joinery would yield some sort of cabinetmaking epiphany…Nope! Just a few more reasons why not to make a bookcase this way.
Before pressing on with how I cut these dovetails, a few words about Scott and the original desk are in order. Peter Scott is the earliest documented Williamsburg cabinetmaker: he was here working by 1722 after receiving his training in Britain. This desk, made for the Baytop family of Gloucester, VA (across the York River from Williamsburg) is the earliest such piece attributed to any Williamsburg maker and is currently owned by the College of William and Mary. Stylistically and structurally, it is the forbearer of the kinds of case pieces we typically built in the third quarter of the 18th century. While Scott’s appearance in Williamsburg predates the Hay shop by nearly three decades, he was also our contemporary – and presumably competitor – working up until his death at 81 years of age in 1775 (the Hay shop closed in ’76). I’ll have a lot more to say about the desk in the coming weeks, but what about those dovetails?
In essence this joint is a pair of sliding dovetails and that’s how I approached the process of making it with one exception. Typically I like to cut dovetails pins first and sliding dovetails tails first. Here, I opted for pins first with good reason, but more on that later. After laying out the socket (I’m demonstrating here on some scrap) I made a relief cut at the two corners along the base line. As the out of focus shot below tries to illustrate this can be done with a center bit in a brace or a mortise chisel. We’ve seen marks from center bits in sliding dovetails on 18th century table pedestals.
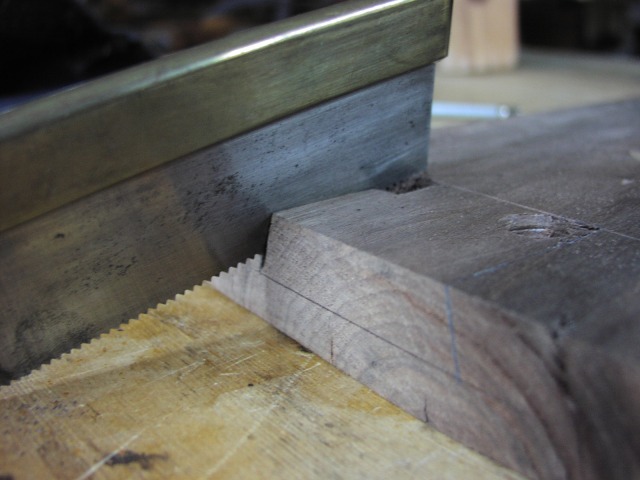
Next, I carefully sawed out the slope of the joint beginning with the front corner and working back. The first step provides space to work the saw.
After making some quick relief cuts, I chiseled along the base line to cleanly define that boundary.
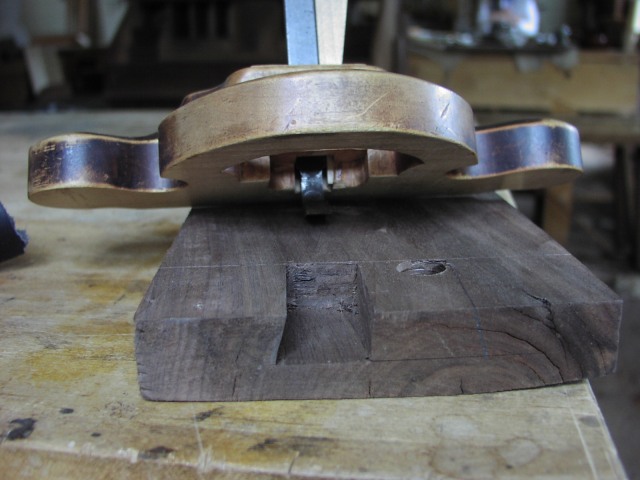
The rest of the material was rapidly chiseled out and the recess was cleaned up with a router plane (I’m only showing half the joint here).
Finally I used a broad, sharp paring chisel to clean up the sloped edge of the socket. By starting at the front corner and working back towards the baseline, I could really control the cut by using the chisel’s flat back as a reference surface. Of course this is initially referenced off the front corner of the socket, which was the only part of the joint that I could see during sawing.
If this were a true sliding dovetail, I’d want the joint to be perfectly tight up front and a little looser back toward the baseline. Here, because the bottom board is far thinner than the socket is long I need the joint to be tightest back at the baseline and because the front edge of the socket is used to mark the tails it needs to line up perfectly with the back. In other words there can be no taper to this joint as is often the case with a sliding dovetail! If I cut the tails first my saw work for the socket would have had to have been nearly perfect. By cutting the socket first I can fuss with it until everything is straight and square without worrying about the exact size of the tails.
Why do any of this?
Well, as stated above, the bottom needs to be raised up to accommodate the candle slides that mount below the bookcase (see the first picture). But why not install the bottom with a sliding dovetail that runs across the sides of the case from front to back? Oh and by the way, a traditional sliding dovetail would not be prone to shifting down over time with gravity and the weight of all those books on the shelf. Of course, these dovetails do help keep the bookcase locked together and with some added glue blocks the demands of gravity can be met. Perhaps cutting two big tails seemed like a more expedient approach than making sliding dovetails, but judging from the construction of the desk itself Scott knew how to cut long sliding dovetails with ease. One final and strong possibility is that this is how Peter Scott learned how to construct a piece like this, but that’s basically just a dressed up way of saying “because!”
Why am I constructing the desk this way? Because that’s how Peter Scott did it, but the whole point of historically informed cabinetmaking is not to rest on unthinking answers like this. Maybe after going through the whole process I can’t answer my initial question, but I’ve answered and asked a slew of new questions I did not think of in the first place. At the end of the day I’ve got some really big dovetails, some new techniques in my bag, and an increased awareness of 18th century techniques.
Curiosity, according to the old saying, is deadly for cats, but it’s the lifeblood of period furniture making.
BP.


This is a great blog. Keep up the good work, Brian?
Very imformative and enjoyable post. Even if you can’t explain the why, you explained the how to very well. I would think that being able to examine the original pieces that you reproduce and investigating why certain methods and techniques were used has to be a pretty fun part of your work there. Looking forward to more about this desk and bookcase. It’s really looking good so far. Thanks for sharing.
Extremely interesting post, Bill. Maybe the answer to the “why” is expansion control? Maybe Mr. Scott’s training included thoughts towards climate changes and this was a way to lock the case sides to the shelves and allowed the entire case to move as one? I don’t know, just a thought.
Thank you for this blog! You and the other folks there should be proud of your work! Your writings and insight are refreshing and informative. Keep up the great work!
Chuck D.
Absolutely Chuck, this design does allow for wood movement and Scott’s work shows that he was trained in how to build around these issues. Though he, like a lot of cabinetmakers, will pay attention to wood movement in one part of a piece and ignore it in others. I’ll point out some of these instances in future posts. Of course, a traditional sliding dovetail would also allow for movement to a point…
Thanks,
Bill P.
thanks Bill.
Great post. Is the front rail attached with just the cut nails to the sides? Does it rest higher, lower or even with the bottom of the case? This also seems to be an expedient way to attach it.
Look forward to your future posts on this piece.
Jim
Jim, the front rail is glued and nailed to the case sides (nails made by our CW blacksmiths) and glued along the front edge of the bottom board. It rests even with the bottom of the case sides and its top edege sits a 1/4″ below the top edge of the bottom board. The doors will be hinged with knife-type hinges to this applied rail. Indeed, it’s a great example of an expedient building technique.
Bill P.
This is a great Blog! I look forward to more.
Thanks!
This particular case piece looks like a lot of fun. Thank you for sharing with us. Sometimes I wish I could just build a piece totally by hand, yet most of my clients don’t want to pay for it. It is great to be able to see some of the process. I have one question, Is it possible to purchase some of the tools you use in the Anthony Hay shop???? For I am extremely interested in some of the tools. Thanks
Freddy
Freddy, unfortunately Colonial Williamsburg does not typically sell tools. Our behind-the-scenes toolmakers shop just isn’t set up for that kind of production work. Some of our tools were/are made by the blacksmiths here and on occasion there are hold fasts, striking knives, etc. for sale in the Prentis store here at CW. Many of our tools come from the good old internet. Most of our molding and joinery planes come from Clark & Williams (I know they have a new name for their business now, but can’t remember what it is), though there are several other small companies out there making really fine reproductions of eighteenth century tools. So your best bet would be to search the internet…sorry!
Old Street Tool Inc. is the new name for Clark and Williams. They have quite a waiting list for new orders, so be prepared to wait. The other option, if you are so inclined, is to make your own 18th century style planes. One book that will help you is
John Whelan’s Making Traditional Wooden Planes
Thanks for the very informative blog. Can this post serve as subscription to further writings?
Great work.
Outstanding post. I hope in the future, you will go into more detail on your execution of a true sliding dovetail joint. Not much is said on these when done by hand and perhaps that is because they are pretty tough to cut in my experience. From you wrote already I can see some light bulb moments between your technique and mine. For instance I always cut the pin first because I find it is easier to trim the tail to fit to get that tapered effect. I can definitely see your reasonings for tails first here and will have to give it a try. Please consider delving into this topic a bit more. Thanks again for sharing to all of you. I feel like we as readers are getting to know the cabinetmakers individually in all of this.
Well written informative blog, along with clear up close pictures. Thank you. I will be checking in regularly in order to learn
Pingback: Anthony Hay Cabinet Shop Blog is a Must Read | The Renaissance Woodworker
You wrote: “Typically I like to cut dovetails pins first and sliding dovetails tails first. Here, I opted for pins first with good reason”
Which did you mean here? Sorry for grammar-patrolling, and I know the post is a couple years old, but this was genuinely confusing at first in an otherwise very interesting post. Thank you!
Sorry Johann, I cut these joints pins first. They are kind of like sliding dovetails, which I would normally cut tails first. Here, for the reasons stated, I opted for pins first instead.
Pingback: Walnut Desk and Bookcase Part I: The Bookcase | Anthony Hay's, Cabinetmaker
Great! – now I again know why I’ve been enjoying this hobby since around 1952.
Anthony your clear writing, photos & ALL comments added to my pleasure – really making more than my day & night in our Kalahari/Namibia.
My congratulatory thanks – keep them rolling!